# 中文文档
# Vue3 带来了什么
# 性能的提升
- 打包大小减少 41%
- 初次渲染快 55%,更新渲染快 133%
- 内存减少 54%
…
# 源码的升级
- 使用 proxy 代替 defineProperty 实现响应式
- 重写虚拟 DOM 的实现和 Tree-shaking
…
# 拥抱 TypeScript
- Vue3 可以更好的支持 TypeScript
# 新的特性
-
- Composition API (组合 API)
- setup 配置
- ref 与 relative
- watch 与 watchEffect
- provide 与 inject
…
-
- 新的内置组件
- Fragment
- Teleport
- Suspense
-
- 其他修改
- 新的生命周期钩子
- data 选项应始终被声明为一个函数
- 移除 KeyCode 支持作为 v-on 的修饰符
…
# 创建 Vue3 工程
-
使用 vue-cli 创建
官方文档:https://cli.vuejs.org/zh/guide/creating-a-project.html#vue-create// 查看@vue/cli版本,确保@vue/cli版本在4.5.0以上 vue --version // 安装或者升级你的@vue/cli npm install -g @vue/cli // 创建 vue create vue_test // 启动 cd vue_test npm run serve -
使用 vite 创建
官方文档:https://v3.cn.vuejs.org/guide/installation.html#vite
vite 官网:https://vitejs.cn-
什么是 vite?———— 新一代前端构建工具。在开发环境下基于浏览器原生 ES imports 开发,他做到了本地快速开发启动,在生产环境下基于 Rollup 打包
-
优势如下:
- 开发环境中,无需打包操作,可快速的冷启动。
- 轻量快速的热重载 (HMR)
- 真正的按需编译,不再等待整个应用编译完成。
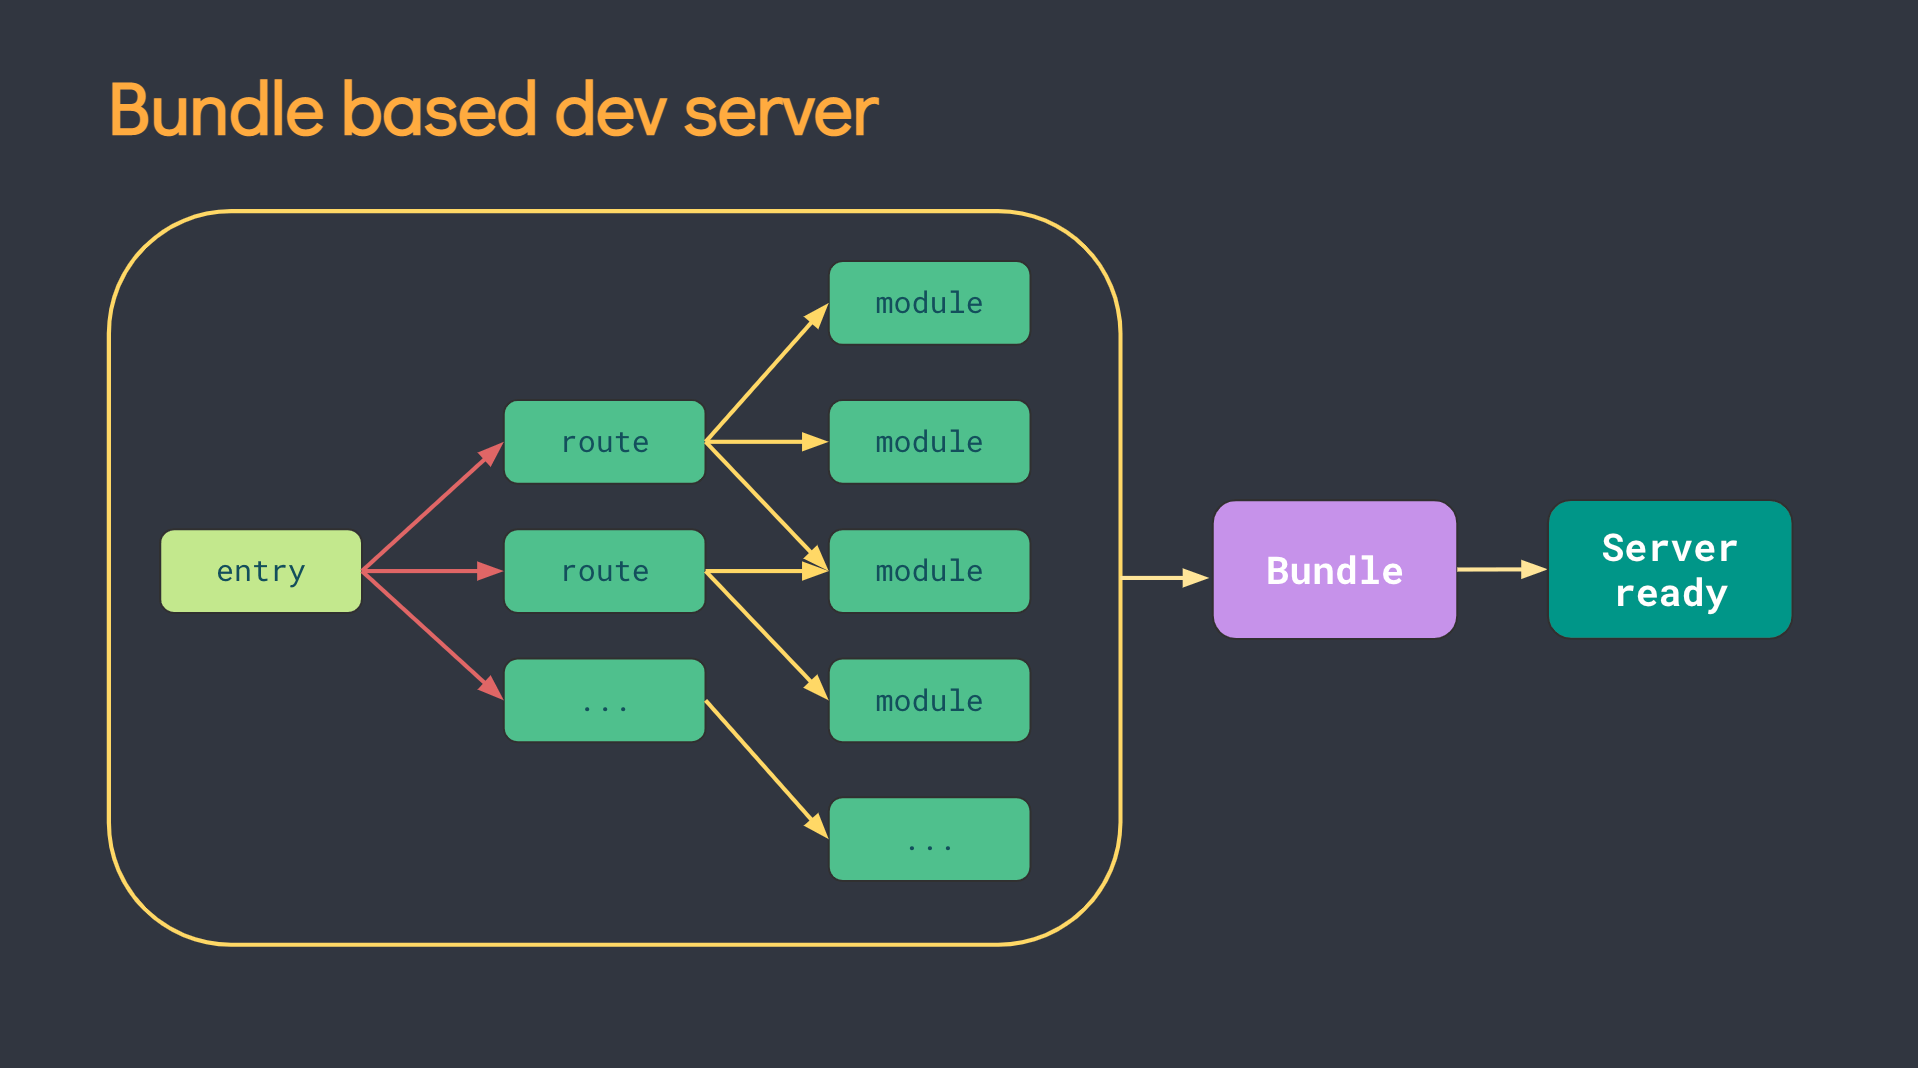
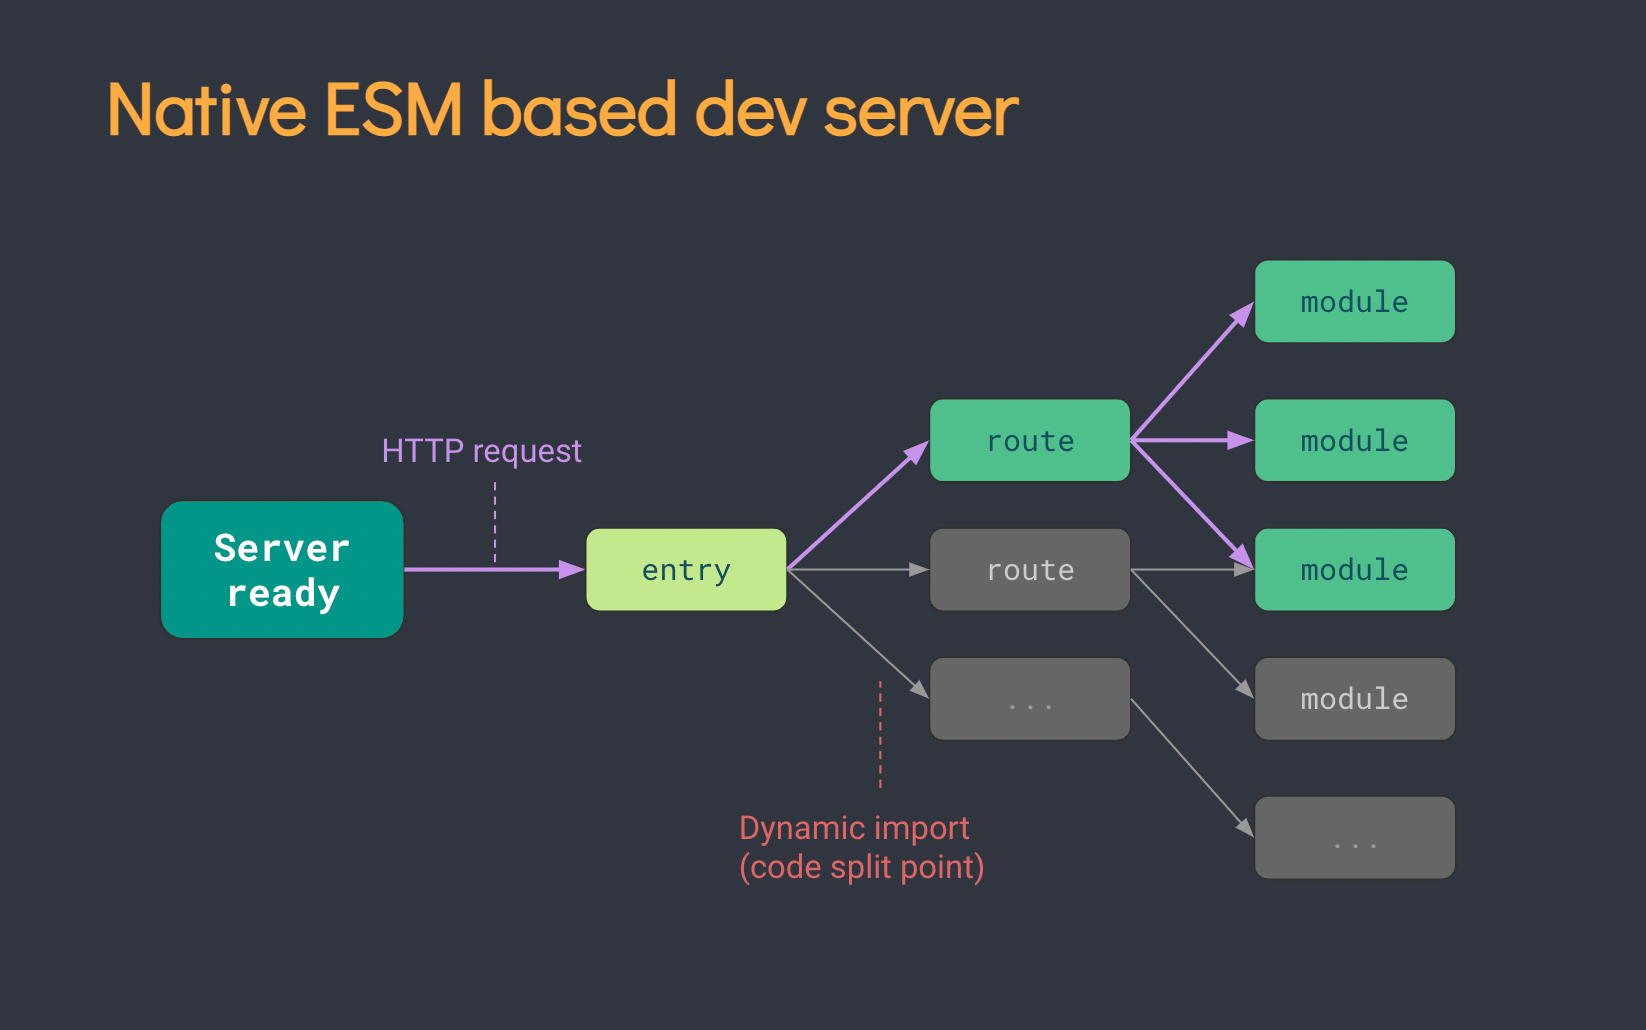
-
创建
// 创建工程
npm init vite-app <project-name>:npm init vite-app vue3_test_vite
// 进入工程目录
cd  <project-name>:cd vue3_test_vite
// 安装依赖
npm install
// 运行
npm run dev
-
# 分析工程结构
-
main.js
// 引入不再是Vue构造函数了,引入的是一个名为createApp的工厂函数 import { createApp } from "vue"; import App from "./App.vue"; // 创建应用实例对象 createApp(App).mount("#app"); // createApp(App).mount("#app")等于以下的语句 const app = createApp(App); app.mount("#app"); -
App.vue
<template>
  // Vue3组件中的模板结构可以没有根目录
  <img src="" />
  <HelloWord msg="Hello World!" />
</template>
<script lang='ts'>
  // defineComponent函数,目的是定义一个组件,内部可以传入一个配置对象
  import {defineComponent} from "vue"
  import HelloWord from "./commponents/HelloWord.vue";
  export default defineComponent({
    name: "App",
    components: { HelloWord },
  })
</script>
<style></style>
# Composition (组合式) API---- 常用部分
官方文档:https://v3.cn.vuejs.org/guide/composition-api-introduction.html
# 拉开序幕的 setup
-
新的 option, 所有的组合 API 函数都在此使用,只在初始化时执行一次
-
函数如果返回对象,对象中的属性或方法,模板中可以直接使用
-
案例
<template>
  <div>哈哈,我又变帅了</div>
  <h1>{{number}}</h1>
</template>

<script lang="ts">
// defineComponent函数,目的是定义一个组件,内部可以传入一个配置对象
import { defineComponent } from "vue";
// 暴露出去一个定义好的组件
export default defineComponent({
  // 当前组件的名字是App
  name: "App",
  // setup是组合API中第一个要使用的函数
  setup(){
    const number =10
    return {
      number
    }
  }
});
</script>
# setup 和 ref 的基本使用
-
作用:用来定义一个基本类型的响应式数据
-
语法: const xxx = ref (initValue):
- 创建一个包含响应式数据的引用 (reference) 对象
- js 中操作数据: xxx.value
- 模板中操作数据:不需要.value
-
案例
<template>
  <h2>setup和ref的基本使用</h2>
  <h3>{{ count }}</h3>
  <button @click="updateCount">更新数据</button>
</template>

<script lang="ts">
import { defineComponent, ref } from "vue";
export default defineComponent({
  name: "App",
  // 需求:页面打开后可以直接看到一个数据,点击按钮后,该数据可以发生变化
  // vue2的方式实现
  // data() {
  //   return {
  //     count: 0,
  //   }
  // },
  // methods: {
  //   updateCount() {
  //     this.count++
  //   },
  // },

  // vue3的方式实现
  // setup是组合API的入口函数,setup返回的是一个对象
  setup() {
    // 变量
    // count 的类型是Ref类型
    const count = ref(0);

    // 方法
    function updateCount() {
      // count++报错的原因:count是一个Ref对象,对象是不能进行++的操作
      count.value++;
    }
    // 返回的是一个对象
    return {
      // 属性
      count,
      // 方法
      updateCount
    };
  }
});
</script>
# reactive
-
作用:定义多个数据的响应式
-
const proxy = reactive (obj): 接收一个普通对象然后返回该普通对象的响应式代理器对象
-
响应式转换是 “深层的”:会影响对象内部所有嵌套的属性
-
内部基于 ES6 的 Proxy 实现,通过代理对象操作源对象内部数据都是响应式的
-
案例
<template>
  <h3>名字:{{ user.name }}</h3>
  <h3>年龄:{{ user.age }}</h3>
  <h3>性别:{{ user.gender }}</h3>
  <h3>媳妇:{{ user.wife }}</h3>
  <button @click="updateUser">更新数据</button>
</template>

<script lang="ts">
import { defineComponent, reactive } from 'vue'
export default defineComponent({
  name: 'App',
  setup() {
    // const obj: any = { // 为了在使用obj.gender='男' 的时候不出现ts错误的提示信息才这么书写
    const obj = {
      name: '小明',
      age: 20,
      wife: {
        name: '小甜甜',
        age: 18,
        cars: ['奔驰', '宝马', '奥迪'],
      },
    }
    // 把复杂数据变成响应式的数据
    // 返回的是一个Proxy的代理对象,被代理的目标对象就是obj对象(reactive中传入的对象)
    // user现在是代理对象,obj是目标对象
    // user对象的类型是Proxy
    const user = reactive<any>(obj)

    // 方法
    // function updateUser(){}
    const updateUser = () => {
      // 直接使用目标对象的方式来更新目标对象中的成员的值,是不可能的,只能使用代理对象的方式来更新数据(响应式数据)
      // obj.name += '==='

      // 下面的可以
      // user.name += '=='
      // user.age += 2
      // user.wife.name += '++'
      // user.wife.cars[0] = '玛莎拉蒂'

      // user---->代理对象,user---->目标对象
      // user对象或者obj对象添加一个新的属性,哪一种方式会影响界面的更新
      // obj.gender = '男' // 这种方式,界面没有更新渲染
      // user.gender = '男' // 这种方式,界面可以更新渲染,而且这个数据最终也添加到了obj对象上了
      // user对象或者obj对象中移除一个已经存在的属性,哪一种方式会影响界面的更新
      // delete obj.age // 界面没有更新渲染,obj中确实没有了age这个属性
      // delete user.age  // 界面更新渲染了,obj中确实没有了age这个属性

      // 总结: 如果操作代理对象,目标对象(target)中的数据也会随之变化,同时如果想要在操作数据的时候,界面也要跟着重新更新渲染,那么也是操作代理对象

      // 通过当前的代理对象找到该对象中的某个属性,更改该属性中的某个数组的数据
      // user.wife.cars[1] = '玛莎拉蒂'

      // 通过当前的代理对象把目标对象中的某个数组属性添加一个新的属性
      user.wife.cars[3] = '奥拓'
    }
    return {
      user,
      updateUser,
    }
  },
})
</script>
# 比较 Vue2 和 Vue3 的响应式
# Vue2 的响应式
-
核心:
- 对象:通过 defineProperty 对对象的已有属性值的读取和修改进行劫持 (监视 / 拦截)
- 数组:通过重写数组更新数组一系列更新元素的方法来实现元素修改的劫持
Object.defineProperty(data, "count", { get() {}, set() {}, }); -
问题
- 对象直接新添加的属性或删除已有属性,界面不会自动更新
- 直接通过下标替换元素或更新 length, 界面不会自动更新 arr [1] = {}
# Vue3 的响应式
- 核心:
- 通过 Proxy (代理): 拦截对 data 任意属性的任意 (13 种) 操作,包括属性值的读写,属性的添加,属性的删除等…
- 通过 Reflect (反射): 动态对被代理对象的相应属性进行特定的操作
- 文档
new Proxy(data, {
  // 拦截读取属性值(获取目标对象的某个属性值)
  get(target, prop) {
    return Reflect.get(target, prop);
  },
  // 拦截设置属性值或添加新属性(修改目标对象的属性值/为目标对象添加新的属性)
  set(target, prop, value) {
    return Reflect.set(target, prop, value);
  },
  // 拦截删除属性(删除目标对象上的某个属性)
  deleteProperty(target, prop) {
    return Reflect.deleteProperty(target, prop);
  },
});

proxy.name = "tom";
const user = {
name: "John",
age: 12,
};
/*
proxyUser是代理对象, user是被代理对象
后面所有的操作都是通过代理对象来操作被代理对象内部属性
*/
const proxyUser = new Proxy(user, {
get(target, prop) {
console.log("劫持get()", prop);
return Reflect.get(target, prop);
},
set(target, prop, val) {
console.log("劫持set()", prop, val);
return Reflect.set(target, prop, val); // (2)
},
deleteProperty(target, prop) {
console.log("劫持delete属性", prop);
return Reflect.deleteProperty(target, prop);
},
});
// 读取属性值
console.log(proxyUser === user);
console.log(proxyUser.name, proxyUser.age);
// 设置属性值
proxyUser.name = "bob";
proxyUser.age = 13;
console.log(user);
// 添加属性
proxyUser.sex = "男";
console.log(user);
// 删除属性
delete proxyUser.sex;
console.log(user);# setup 细节
-
setup 执行的时机
- 在 beforeCreate 生命周期回调之前就执行了,而且就执行一次, 此时组件对象还没有创建
- this 是 undefined, 不能通过 this 来访问 data/computed/methods/props
- 其实所有的 composition API 相关回调函数中也都不可以
-
setup 的返回值
-
一般都返回一个对象:为模板提供数据,也就是 HTML 模板中可以直接使用此对象中的所有属性 / 方法
-
返回对象中的属性会与 Vue2 中 data 函数返回对象的属性合并成为组件对象的属性 (返回对象中的属性会与 Vue2 中 data 函数返回对象的属性都可以在 HTML 模板中使用)
-
返回对象中的方法会与 methods 中的方法合并成功组件对象的方法
-
如果有重名,setup 优先
-
注意:
- 一般不要混合使用: methods 中可以访问 setup 提供的属性和方法,但在 setup 方法中不能访问 data 和 methods
- setup 不能是一个 async 函数:因为返回值不再是 return 的对象,而是 promise, 模板看不到 return 对象中的属性数据
-
-
setup 的参数
-
setup (props, context) 可以写成: setup (props, {attrs, slots, emit})
-
props 对象:里面有父级组件向子级组件传递的数据,并且是在子级组件中使用 props 接收到的所有的属性
-
attrs 对象:没有在 props 配置中声明的属性的对象 (获取当前组件标签上的所有的属性的对象,但是该属性是在 props 中没有声明接收的所有的尚需经的对象), 相当于 this.$attrs
-
slots 对象:包含所有传入的插槽内容的对象,相当于 this.$slots
-
emit 方法:用来分发自定义事件的函数,相当于 this.$emit
-
-
案例
-
App.vue
<template> <h2>App父级组件</h2> <h3>msg:{{ msg }}</h3> <button @click="msg += '==='">更新数据</button> <hr /> <Child :msg="msg" msg2="真香" @xxx="xxx" /> </template> <script lang="ts"> import { defineComponent, ref } from 'vue' import Child from './components/Child.vue' export default defineComponent({ name: 'App', components: {Child}, setup() { // 定义一个Ref类型的数据 const msg = ref('what are you no sha lei') function xxx(txt: string) { msg.value += txt } return { msg, xxx, } }, }) </script> -
Components—>Child.vue
<template>
  <h2>Child子级组件</h2>
  <h3>msg:{{ msg }}</h3>
  // <h3>count:{{ count }}</h3>
  <button @click="emitXxx">分发事件</button>
</template>
<script lang="ts">
import { defineComponent, ref } from 'vue'
export default defineComponent({
  name: 'Child',
  props: ['msg'],

  // setup(props,context) {
  setup(props, { attrs, slots, emit }) {
    // console.log(context.attrs.msg2)
    const showMsg1 = () => {
      console.log('setup中的showMsg1方法')
    }
    // 按钮的点击事件的回调函数
    function emitXxx() {
      // context.emit('xxx','++')
      emit('xxx', '++')
    }
    return {
      showMsg1,
      emitXxx,
      // setup中一般都是返回一个对象,对象中的属性和方法都可以在html模版中直接使用
    }
  },
  // data() {
  //   return {
  //     count: 10,
  //   }
  // },
  // // 界面渲染后的生命周期回调
  // mounted() {
  //   console.log(this)
  // },
  // // 方法的
  // methods: {
  //   showMsg2() {
  //     console.log('methods中的showMsg方法')
  //   },
  // },
})
</script>
-
# reactive 和 ref 细节
-
是 Vue3 的 composition API 中 2 个最重要的响应式 API
-
ref 用来处理基本类型数据,reactive 用来处理对象 (递归深度响应式)
-
如果用 ref 对象 / 数组,内部会自动将对象 / 数组转换为 reactive 的代理对象
-
ref 内部:通过给 value 属性添加 getter/setter 来实现对数据的劫持
-
reactive 内部:通过使用 Proxy 来实现对对象内部所有数据的劫持,并通过 Reflect 操作对象内部数据
-
ref 的数据操作:在 js 中要.value, 在模板中不需要 (内部解析模板时会自动添加.value)
-
案例
<template>
  <h3>m1:{{ m1 }}</h3>
  <h3>m2:{{ m2 }}</h3>
  <h3>m3:{{ m3 }}</h3>
  <button @click="update">更新数据</button>
</template>
<script lang="ts">
import { defineComponent, ref, reactive } from 'vue'
export default defineComponent({
  name: 'App',
  setup() {
    // 通过ref的方式设置的数据
    const m1 = ref('abc')
    const m2 = reactive({
      name: '小明',
      wife: {
        name: '小红',
      },
    })
    // ref也可以传入对象吗
    const m3 = ref({
      name: '小明',
      wife: {
        name: '小红',
      },
    })
    // 更新数据
    const update = () => {
      // ref中如果放入的是一个对象,那么是经过了reactive的处理,形成了一个Proxy类型的对象
      console.log(m3)
      m1.value += '==='
      m2.wife.name += '==='
      m3.value.wife.name += '==='
      console.log(m3.value.wife)
    }
    return {
      m1,
      m2,
      m3,
      update,
    }
  },
})
</script>
# 计算属性与监视
-
computed 函数:与 computed 配置功能一致
-
watch 函数:与 watch 配置功能一致
- 监视指定的一个或多个响应式数据,一旦数据变化,就自动执行监视回调
- 默认初始时不执行回调,但可以通过配置 immediate 为 true, 来指定初始时立即执行第一次
- 通过配置 deep 为 true, 来指定深度监视
-
watchEffect 函数
- 不用直接指定要监视的数据,回调函数中使用的哪些响应式数据就监视哪些响应式数据
- 默认初始时就会执行第一次,从而可以收集需要监视的数据
- 监视数据发生变化时回调
-
案例
<template>
<h2>计算属性和监视</h2>
// <fieldset> 标签将表单内容的一部分打包,生成一组相关表单的字段。
<fieldset>
  <legend>姓名操作</legend>
  姓氏:<input
    type="text"
    placeholder="请输入姓氏"
    v-model="user.firstName"
  /><br />
  名字:<input
    type="text"
    placeholder="请输入名字"
    v-model="user.lastName"
  /><br />
</fieldset>
<fieldset>
  <legend>计算属性和监视的演示</legend>
  姓名:<input type="text" placeholder="显示姓名" v-model="fullName1" /><br />
  姓名:<input type="text" placeholder="显示姓名" v-model="fullName2" /><br />
  姓名:<input type="text" placeholder="显示姓名" v-model="fullName3" /><br />
</fieldset>
</template>
<script lang="ts">
import {
  defineComponent,
  reactive,
  computed,
  watch,
  ref,
  watchEffect,
} from 'vue'
export default defineComponent({
  name: 'App',
  setup() {
    // 定义一个响应式对象
    const user = reactive({
      firstName: '东方',
      lastName: '不败',
    })
    // 计算属性的函数中如果只传入一个回调函数,表示的是get
    // 返回的是一个Ref类型的对象
    const fullName1 = computed(() => {
      return user.firstName + '_' + user.lastName
    })

    const fullName2 = computed({
      get() {
        return user.firstName + '_' + user.lastName
      },
      set(val: string) {
        const names = val.split('_')
        user.firstName = names[0]
        user.lastName = names[1]
      },
    })

    // 第三个姓名:
    const fullName3 = ref('')
    // 监视----监视指定的数据
    watch(
      user,
      ({ firstName, lastName }) => {
        fullName3.value = firstName + '_' + lastName
      },
      { immediate: true, deep: true }
    )

    // 监视,不需要配置immediate,本身默认就会进行监视,(默认执行一次)
    // watchEffect(() => {
    //   fullName3.value = user.firstName + '_' + user.lastName
    // })

    // 监视fullName3的数据,改变firstName和lastName
    watchEffect(() => {
      const names = fullName3.value.split('_')
      user.firstName = names[0]
      user.lastName = names[1]
    })

    // watch---可以监视多个数据的
    // watch([user.firstName,user.lastName,fullName3],()=>{
    //   // 这里的代码就没有执行,reactive的监听需要以函数返回值的形式监听
    //   console.log('====')
    // })

    // 当我们使用watch监视reactive的数据的时候,代码需要改一下
    watch([()=>user.firstName, ()=>user.lastName,fullName3], () => {
      console.log('====')
    })

    return {
      user,
      fullName1,
      fullName2,
      fullName3,
    }
  },
})
</script>
# 生命周期对比
# 与 2.x 版本生命周期相对应的组合式 API
- beforeCreate -> 使用 setup ()
- created -> 使用 setup ()
- beforeMount -> onBeforeMount
- mounted -> onMounted
- beforeUpdate -> onBeforeUpdate
- updated -> onUpdated
- beforeDestroy -> onBeforeUnmount
- destroyed -> onUnmounted
- errorCaptured -> onErrorCaptured
# 新增的钩子函数
组合式 API 还提供了以下调试钩子函数:
-
onRenderTracked
-
onRenderTriggered
-
案例
<script lang="ts">
import {
  ref,
  onMounted,
  onUpdated,
  onUnmounted,
  onBeforeMount,
  onBeforeUpdate,
  onBeforeUnmount
} from "vue"

export default {
  // beforeCreate,created,beforeMount,mounted,beforeUpdate,updated,beforeUnmount,unmounted这些是2.x的版本,其中只修改了2.x最后的两个生命周期名字,在3.x中的写法如下:

  setup() {

    const msg = ref('abc')

    const update = () => {
      msg.value += '--'
    }

    onBeforeMount(() => {
      console.log('--onBeforeMount')
    })

    onMounted(() => {
      console.log('--onMounted')
    })

    onBeforeUpdate(() => {
      console.log('--onBeforeUpdate')
    })

    onUpdated(() => {
      console.log('--onUpdated')
    })

    onBeforeUnmount(() => {
      console.log('--onBeforeUnmount')
    })

    onUnmounted(() => {
      console.log('--onUnmounted')
    })

    return {
      msg,
      update
    }
  }
}
</script>
# 自定义 hook 函数
-
使用 Vue3 的组合 API 封装的可复用的功能函数
-
自定义 hook 的作用类似于 vue2 中的 mixin 技术
-
自定义 Hook 的优势:很清楚复用功能代码的来源,更清楚易懂
-
案例
-
App.vue
<template> <h2>自定义hook函数操作</h2> <h2>x:{{ x }},y:{{ y }}</h2> <h3 v-if="loading">正在加载中....</h3> <h3 v-else-if="errorMsg">错误信息:{{ errorMsg }}</h3> <ul v-else> <li>id:{{ data.id }}</li> <li>address:{{ data.address }}</li> <li>distance:{{ data.distance }}</li> </ul> <hr /> // 数组数据 <ul v-for="item in data" :key="item.id"> <li>id:{{ item.id }}</li> <li>title:{{ item.title }}</li> <li>price:{{ item.price }}</li> </ul> </template> <script lang="ts"> import { defineComponent, watch } from 'vue' import useMousePosition from './hooks/useMousePosition' import useRequest from './hooks/useRequest' // 定义接口,约束对象的类型 interface AddressData { id: number; address: string; distance: string; } interface ProductsData { id: string; title: string; price: number; } export default defineComponent({ name: 'App', // 需求1:用户在页面中点击页面,把点击的位置的横纵坐标收集起来并展示出来 setup() { const { x, y } = useMousePosition() // 发送请求 // const { loading, data, errorMsg } = useRequest<AddressData>('/data/address.json') // 获取对象数据 const { loading, data, errorMsg } = useRequest<ProductsData[]>( '/data/products.json' ) // 获取数组数据 // 监视 watch(data, () => { if (data.value) { console.log(data.value.length) } }) return { x, y, loading, data, errorMsg, } }, }) </script> -
hooks 文件夹 ->useMousePosition.ts
import { onBeforeUnmount, onMounted, ref } from "vue"; export default function () { const x = ref(-1); const y = ref(-1); // 点击事件的回调函数 const clickHandler = (event: MouseEvent) => { x.value = event.pageX; y.value = event.pageY; }; // 页面已经加载完毕了,再进行点击的操作 // 页面加载完毕的生命周期组合API onMounted(() => { window.addEventListener("click", clickHandler); }); // 页面卸载之前的生命周期组合API onBeforeUnmount(() => { window.removeEventListener("click", clickHandler); }); return { x, y, }; } -
hooks 文件夹 ->useRequest.ts
import { ref } from "vue";
import axios from "axios";
export default function <T>(url: string) {
  const loading = ref(true);
  const data = (ref < T) | (null > null); // 坑
  const errorMsg = ref("");
  axios
    .get(url)
    .then((response) => {
      // 改变加载状态
      loading.value = false;
      data.value = response.data;
    })
    .catch((error) => {
      // 改变加载状态
      loading.value = false;
      errorMsg.value = error.message || "未知错误";
    });
  return {
    loading,
    data,
    errorMsg,
  };
}
-
# toRefs
可以把一个响应式对象转换成普通对象,该普通对象的每个 property 都是一个 ref
应用:当从合成函数返回响应式对象时,toRefs 非常有用,这样消费组件就可以在不丢失响应式的情况下对返回的对象进行分解使用
问题: reactive 对象取出的所有属性值都是非响应式的
解决:利用 toRefs 可以将一个响应式 reactive 对象的所有原始属性转换为响应式的 ref 属性
-
App.vue
<template>
  <h2>toRefs的使用</h2>

  <h3>name:{{ name }}</h3>
  <h3>age:{{ age }}</h3>

  <h3>name2:{{ name2 }}</h3>
  <h3>age2:{{ age2 }}</h3>
</template>
<script lang="ts">
import { defineComponent, reactive, toRefs } from 'vue'

function useFeatureX() {
  const state = reactive({
    name2: '自来也',
    age2: 47,
  })
  return {
    ...toRefs(state),
  }
}
export default defineComponent({
  name: 'App',
  setup() {
    const state = reactive({
      name: '自来也',
      age: 47,
    })
    // toRefs可以把一个响应式对象转换成普通对象,该普通对象的每个 property 都是一个 ref
    // const state2 = toRefs(state)
    const { name, age } = toRefs(state)
    // 定时器,更新数据,(如果数据变化了,界面也会随之变化,肯定是响应式的数据)
    setInterval(() => {
      // state.name += '==' 这两种都可以实现
      // state2.name.value+='===' 这两种都可以实现
      name.value += '==='
      console.log('======')
    }, 1000)

    const { name2, age2 } = useFeatureX()
    return {
      // state //这种可以
      // ...state2  toRefs返回来的对象
      name,
      age,
      name2,
      age2,
    }
  },
})
</script>
# ref 获取元素
利用 ref 函数获取组件中的标签元素
功能需求:让输入框自动获取焦点
-
App.jsx
<template>
  <h2>App</h2>
  <input type="text">---
  <input type="text" ref="inputRef">
</template>

<script lang="ts">
import { onMounted, ref } from 'vue'
// ref获取元素: 利用ref函数获取组件中的标签元素
// 功能需求: 让输入框自动获取焦点
export default {
  setup() {
    const inputRef = ref<HTMLElement|null>(null)

    onMounted(() => {
      inputRef.value && inputRef.value.focus()
    })

    return {
      inputRef
    }
  },
}
</script>
# Composition (组合式) API---- 其他部分
# shallowReactive 与 shallowRef
-
shallowReactive: 只处理了对象内最外层属性的响应式 (也就是浅响应式) -
shallowRef: 只处理了 value 的响应式,不进行对象的 reactive 处理 -
什么时候用浅响应式呢?
- 一般情况下使用 ref 和 reactive 即可
- 如果有一个对象数据,结构比较深,但变化时只是外层属性变化 ===>
shallowReactive - 如果有一个对象数据,后面会产生新的对象来替换 ===>
shallowRef
-
App.vue
<template>
  <h2>shallowReactive和shallowRef</h2>
  <h3>m1:{{ m1 }}</h3>
  <h3>m2:{{ m2 }}</h3>
  <h3>m3:{{ m3 }}</h3>
  <h3>m4:{{ m4 }}</h3>
  <hr />
  <button @click="update">更新数据</button>
</template>
<script lang="ts">
import {
  defineComponent,
  reactive,
  ref,
  shallowReactive,
  shallowRef,
} from 'vue'
export default defineComponent({
  name: 'App',
  setup() {
    // 深度劫持(深监视)----深度响应式
    const m1 = reactive({
      name: '鸣人',
      age: 20,
      car: {
        name: '奔驰',
        color: 'red',
      },
    })
    // 浅劫持(浅监视)----浅响应式
    const m2 = shallowReactive({
      name: '鸣人',
      age: 20,
      car: {
        name: '奔驰',
        color: 'red',
      },
    })
    // 深度劫持(深监视)----深度响应式----做了reactive的处理
    const m3 = ref({
      name: '鸣人',
      age: 20,
      car: {
        name: '奔驰',
        color: 'red',
      },
    })
    // 浅劫持(浅监视)----浅响应式
    const m4 = shallowRef({
      name: '鸣人',
      age: 20,
      car: {
        name: '奔驰',
        color: 'red',
      },
    })
    const update = () => {
      // 更改m1的数据---reactive方式
      // m1.name += '=='
      // m1.car.name += '=='
      // 更改m2的数据---shallowReactive
      // m2.name += '==' 有效果
      // m2.car.name += '===' 没效果
      // 更改m3的数据---ref方式
      // m3.value.name += '===' 有效果
      // m3.value.car.name += '===' 有效果
      // 更改m4的数据---shallowRef方式
      // m4.value.name += '===' 没效果
      // m4.value.name += '===' 没效果
      console.log(m3, m4)
    }
    return {
      m1,
      m2,
      m3,
      m4,
      update,
    }
  },
})
</script>
# readonly 与 shallowReadonly
-
readonly:
- 深度只读数据
- 获取一个对象 (响应式或纯对象) 或 ref 并返回原始代理的只读代理。
- 只读代理是深层的:访问的任何嵌套 property 也是只读的。
-
shallowReadonly
- 浅只读数据
- 创建一个代理,使其自身的 property 为只读,但不执行嵌套对象的深度只读转换 (对象自身的直接属性不可以修改,但是属性中有对象,对象中也有属性,那这个对象里边的属性是可以修改的。如下边的例子所示)
-
应用场景:
- 在某些特定情况下,我们可能不希望对数据进行更新的操作,那就可以包装生成一个只读代理对象来读取数据,而不能修改或删除
-
App.vue
<template>
  <h2>readonly和shallowReadonly</h2>
  <h3>state:{{ state2 }}</h3>
  <hr />
  <button @click="update">更新数据</button>
</template>
<script lang="ts">
import { defineComponent, reactive, readonly, shallowReadonly } from 'vue'
export default defineComponent({
  name: 'App',
  setup() {
    const state = reactive({
      name: '佐助',
      age: 20,
      car: {
        name: '奔驰',
        color: 'yellow',
      },
    })
    // 只读的数据---深度的只读
    // const state2 = readonly(state)
    // 只读的数据---浅只读的
    const state2 = shallowReadonly(state)
    const update = () => {
      // state2.name+='==='
      state2.car.name += '==='
    }
    return {
      state2,
      update,
    }
  },
})
</script>
# toRaw 与 markRaw
-
toRaw
- 返回由 reactive 或 readonly 方法转换成响应式代理的普通对象。
- 这是一个还原方法,可用于临时读取,访问不会被代理 / 跟踪,写入时也不会触发界面更新。
-
markRaw
-
标记一个对象,使其永远不会转换为代理。返回对象本身
-
应用场景:
-
有些值不应被设置为响应式的,例如复杂的第三方类实例或 Vue 组件对象。
-
当渲染具有不可变数据源的大列表时,跳过代理转换可以提高性能。
-
-
-
App.vue
<template>
  <h2>toRaw和markRaw</h2>
  <h3>state:{{ state }}</h3>
  <hr />
  <button @click="testToRaw">测试toRaw</button>
  <button @click="testMarkRaw">测试markRaw</button>
</template>
<script lang="ts">
import { defineComponent, markRaw, reactive, toRaw } from 'vue'
interface UserInfo {
  name: string;
  age: number;
  likes?: string[];
}
export default defineComponent({
  name: 'App',
  setup() {
    const state = reactive<UserInfo>({
      name: '小明',
      age: 20,
    })

    const testToRaw = () => {
      // 把代理对象变成了普通对象了,数据变化,界面不变化
      const user = toRaw(state)
      user.name += '=='
    }
    const testMarkRaw = () => {
      const likes = ['吃', '喝']
      // markRaw标记的对象数据,从此以后都不能再成为代理对象了(数据变化,界面不变化)
      state.likes = markRaw(likes)
      setInterval(() => {
        if (state.likes) {
          state.likes[0] += '='
          console.log('定时器走起来')
        }
      }, 1000)
    }
    return {
      state,
      testToRaw,
      testMarkRaw,
    }
  },
})
</script>
# toRef
-
为源响应式对象上的某个属性创建一个 ref 对象,二者内部操作的是同一个数据值,更新时二者是同步的
-
区别 ref: 拷贝了一份新的数据值单独操作,更新时相互不影响
-
应用:当要将 某个 prop 的 ref 传递给复合函数时,toRef 很有用
-
案例
-
components 文件夹 —>Child.vue
<template> <h2>Child子级组件</h2> <h3>age:{{ age }}</h3> <h3>length:{{ length }}</h3> </template> <script lang="ts"> import { defineComponent, computed, Ref, toRef } from 'vue' function useGetLength(age: Ref) { return computed(() => { return age.value.toString().length }) } export default defineComponent({ name: 'Child', props: { age: { type: Number, required: true, }, }, setup(props) { // 因为上边要的是Ref类型的,所以这里用toRef转换成Ref类型的数据 const length = useGetLength(toRef(props, 'age')) return { length, } }, }) </script> -
App.vue
<template>
  <h2>toRef的使用及特点:</h2>
  <h3>state:{{ state }}</h3>
  <h3>age:{{ age }}</h3>
  <h3>money:{{ money }}</h3>
  <hr />
  <button @click="update">更新数据</button>
  <hr />
  <Child :age="age" />
</template>
<script lang="ts">
import { defineComponent, reactive, toRef, ref } from 'vue'
import Child from './components/Child.vue'
export default defineComponent({
  name: 'App',
  components: {
    Child,
  },
  setup() {
    const state = reactive({
      age: 5,
      money: 100,
    })
    // 把响应式数据state对象中的某个属性age变成了ref对象了
    const age = toRef(state, 'age')
    // 把响应式对象中的某个属性使用ref进行包装,变成了一个ref对象
    const money = ref(state.money)
    const update = () => {
      state.age += 2 // 上边的state变化了
      // age.value += 3 //上边的state变化了
      // money.value += 10 //上边的state没变化
    }
    return {
      state,
      age,
      money,
      update,
    }
  },
})
</script>
-
# customRef
-
创建一个自定义的 ref,并对其依赖项跟踪和更新触发进行显式控制
-
App.vue
<template>
  <h2>CustomRef的使用</h2>
  <input type="text" v-model="keyword" />
  <p>{{ keyword }}</p>
</template>
<script lang="ts">
import { customRef, defineComponent, ref } from 'vue'
// 自定义hook防抖的函数
// value传入的数据,将来数据的类型不确定,所以用泛型,delay防抖的间隔时间.默认是200毫秒
function useDebouncedRef<T>(value: T, delay = 200) {
  // 准备一个存储定时器的id的变量
  let timeOutId: number
  return customRef((track, trigger) => {
    return {
      // 返回数据的
      get() {
        track() // 告诉Vue追踪数据
        return value
      },
      // 设置数据的
      set(newValue: T) {
        // 清理定时器
        clearTimeout(timeOutId)
        // 开启定时器
        timeOutId = setTimeout(() => {
          value = newValue
          trigger() // 告诉Vue更新界面
        }, delay)
      },
    }
  })
}
export default defineComponent({
  name: 'App',
  setup() {
    const keyword = useDebouncedRef('abc', 500)
    return {
      keyword,
    }
  },
})
</script>
# provide 和 inject
-
provide 和 inject 提供依赖注入,功能类似 2.x 的 provide/inject
-
实现跨层级组件 (祖孙) 间通信
-
案例
-
App.vue
<template> <h2>provide 与 inject</h2> <p>当前的颜色:{{ color }}</p> <button @click="color = 'red'">红色</button> <button @click="color = 'yellow'">黄色</button> <button @click="color = 'green'">绿色</button> <hr /> <Son /> </template> <script lang="ts"> import { defineComponent, provide, ref } from 'vue' import Son from './components/Son.vue' export default defineComponent({ name: 'App', components: {Son}, setup() { // 响应式的数据 const color = ref('red') // 提供数据,标识是'color',数据是color // 只是将数据暴露出去,谁想用谁就用inject去接收 provide('color',color) return { color, } }, }) </script> -
Son.vue
<template> <h3>Son子级组件</h3> <hr /> <GrandSon /> </template> <script lang="ts"> import { defineComponent } from 'vue' import GrandSon from './GrandSon.vue' export default defineComponent({ name: 'Son', components: {GrandSon}, }) </script> -
GrandSon.vue
<template>
  <h3 :style="{color}">GrandSon孙子组件</h3>
</template>
<script lang="ts">
import { defineComponent, inject } from 'vue'
export default defineComponent({
  name:'GrandSon',
  setup(){
    // 注入的操作
    // inject里边写provide提供的标识
    const color = inject('color')
    return {
      color
    }
  }
})
</script>
-
# 响应式数据的判断
-
isRef: 检查一个值是否为一个 ref 对象 -
isReactive: 检查一个对象是否是由 reactive 创建的响应式代理 -
isReadonly: 检查一个对象是否是由 readonly 创建的只读代理 -
isProxy: 检查一个对象是否是由 reactive 或者 readonly 方法创建的代理 -
App.vue
<template>
  <h2>响应式数据的判断</h2>
</template>
<script lang="ts">
import { defineComponent, isProxy, isReactive, isReadonly, isRef, reactive, readonly, ref } from 'vue'
export default defineComponent({
  name:'App',
    setup(){
      // isRef: 检查一个值是否为一个 ref 对象
      console.log(isRef(ref({})))
      // isReactive: 检查一个对象是否是由 reactive 创建的响应式代理
      console.log(isReactive(reactive({})))
      // isReadonly: 检查一个对象是否是由 readonly 创建的只读代理
      console.log(isReadonly(readonly({})))
      // isProxy: 检查一个对象是否是由 reactive 或者 readonly 方法创建的代理
      console.log(isProxy(readonly({})))
      console.log(isProxy(reactive({})))
      return{}
    }

})
</script>
# 手写组合 API
# shallowReactive 与 reactive
// shallowReactive(浅的劫持,浅的监视,浅的响应数据) 与 reactive(深的)
// 定义一个reactiveHandler处理对象
const reactiveHandler = {
  // 获取属性值
  get(target, prop) {
    if (prop === "_is_reactive") return true;
    const result = Reflect.get(target, prop);
    console.log("拦截了读取数据", prop, result);
    return result;
  },
  // 修改属性值或者是添加属性
  set(target, prop, value) {
    const result = Reflect.set(target, prop, value);
    console.log("拦截了修改数据或者是添加属性", prop, value);
    return result;
  },
  // 删除某个属性
  deleteProperty(target, prop) {
    const result = Reflect.deleteProperty(target, prop);
    console.log("拦截了删除数据", prop);
    return result;
  },
};
// 定义一个shallowReactive函数,传入一个目标对象
function shallowReactive(target) {
  // 判断当前的目标对象是不是object类型(对象/数组)
  if (target && typeof target === "object") {
    return new Proxy(target, reactiveHandler);
  }
  // 如果传入的数据是基本类型的数据,那么就直接返回
  return target;
}
// 定义一个reactive函数,传入一个目标对象
function reactive(target) {
  // 判断当前的目标对象是不是object类型(对象/数组)
  if (target && typeof target === "object") {
    // 对数组或者是对象中所有的数据进行reactive的递归处理
    // 先判断当前的数据是不是数组
    if (Array.isArray(target)) {
      // 数组的数据要进行遍历操作
      target.forEach((item, index) => {
        target[index] = reactive(item);
      });
    } else {
      // 再判断当前的数据是不是对象
      // 对象的数据也要进行遍历的操作
      Object.keys(target).forEach((key) => {
        target[key] = reactive(target[key]);
      });
    }
    return new Proxy(target, reactiveHandler);
  }
  // 如果传入的数据是基本类型的数据,那么就直接返回
  return target;
}
/* 测试自定义shallowReactive */
const proxyUser1 = shallowReactive({
  name: "小明",
  car: {
    color: "red",
  },
});

proxyUser1.name += "=="; // 劫持到了读和写的数据
proxyUser1.car.color += "=="; // 拦截到了读取数据,但是拦截不到写的数据
delete proxyUser1.name; // 拦截到了删除数据
delete proxyUser1.car.color; // 只拦截到了读取数据,没有拦截到删除数据

/* 测试自定义reactive */
const proxyUser2 = reactive({
  name: "小明",
  car: {
    color: "red",
  },
});

proxyUser2.name += "=="; // 劫持到了读和写的数据
proxyUser2.car.color += "=="; // 劫持到了读和写的数据
delete proxyUser2.name; // 拦截到了删除数据
delete proxyUser2.car.color; // 劫持到了读和删除的数据
# shallowReadonly 与 readonly
const readonlyHandler = {
  get(target, prop) {
    if (prop === "_is_readonly") return true;
    const result = Reflect.get(target, prop);
    console.log("拦截到了读取数据了", prop, result);
    return result;
  },
  set(target, prop, value) {
    console.warn("只能读取数据,不能修改数据或者添加数据");
    return true;
  },
  deleteProperty(target, prop) {
    console.warn("只能读取数据,不能删除数据");
    return true;
  },
};

// 定义一个shallowReadonly函数
function shallowReadonly(target) {
  // 需要判断当前的数据是不是对象
  if (target && typeof target === "object") {
    return new Proxy(target, readonlyHandler);
  }

  return target;
}
// 定义一个readonly函数
function readonly(target) {
  // 需要判断当前的数据是不是对象
  if (target && typeof target === "object") {
    // 判断target是不是数组
    if (Array.isArray(target)) {
      // 遍历数组
      target.forEach((item, index) => {
        target[index] = readonly(item);
      });
    } else {
      // 判断target是不是对象
      // 遍历对象
      Object.keys(target).forEach((key) => {
        target[key] = readonly(target[key]);
      });
    }
    return new Proxy(target, readonlyHandler);
  }
  // 如果不是对象或者数组,那么直接返回
  return target;
}

// 测试shallowReadonly和readonly
const proxyUser3 = shallowReadonly({
  name: "小明",
  cars: ["奔驰", "宝马"],
});
// 可以读取
// console.log(proxyUser3.name)
// 不能修改
// proxyUser3.name = '=='
// 不能删除
// delete proxyUser3.name
// 拦截到了读取,深层次的可以修改。
// proxyUser3.cars[0]='奥迪'
// 拦截到了读取,深层次的可以删除
// delete proxyUser3.cars[0]

const proxyUser4 = readonly({
  name: "小明",
  cars: ["奔驰", "宝马"],
});
// 拦截到了读取
// console.log(proxyUser4.name)
// console.log(proxyUser4.cars[0])
// 只读的
// proxyUser4.name='哈哈'
// 只读的
// proxyUser4.cars[0]='哈哈'
// delete proxyUser4.name
// delete proxyUser4.cars[0]
# shallowRef 和 ref
// 定义一个shallowRef函数
function shallowRef(target) {
  return {
    // 保存target数据保存起来
    _value: target,
    get value() {
      console.log("劫持到了读取数据");
      return this._value;
    },
    set value(val) {
      console.log("劫持到了修改数据,准备更新界面", val);
      this._value = val;
    },
  };
}

// 定义一个ref函数
function ref(target) {
  target = reactive(target);
  return {
    _is_ref: true, // 标识当前的对象是ref对象,和下边标题的案例相匹配
    // 保存target数据保存起来
    _value: target,
    get value() {
      console.log("劫持到了读取数据");
      return this._value;
    },
    set value(val) {
      console.log("劫持到了修改数据,准备更新界面", val);
      this._value = val;
    },
  };
}

const ref1 = shallowRef({
  name: "小明",
  car: {
    color: "red",
  },
});
// 可以得到数据
// console.log(ref1.value)
// 劫持到
// ref1.value ='=='
// 劫持不到
// ref1.value.car='=='

const ref2 = ref({
  name: "小明",
  car: {
    color: "red",
  },
});
// 可以得到数据
// console.log(ref2.value)
// 劫持到
// ref2.value ='=='
// 劫持到
// ref2.value.car ='=='
# isRef 和 isReactive 以及 isReadonly 和 isProxy
这些案例中的判断条件,在上边案例中写了相应的代码
// 定义一个函数isRef,判断当前的对象是不是ref对象
function isRef(obj) {
  return obj && obj._is_ref;
}
// 定义一个函数isReactive,判断当前的对象是不是reactive对象
function isReactive(obj) {
  return obj && obj._is_reactive;
}
// 定义一个函数isReadonly,判断当前的对象是不是readonly对象
function isReadonly(obj) {
  return obj && obj._is_readonly;
}
// 定义一个函数isProxy,判断当前的对象是不是reactive对象或者readonly对象
function isProxy(obj) {
  return isReactive(obj) || isReadonly(obj);
}

console.log(isRef(ref({})));
console.log(isReactive(reactive({})));
console.log(isReadonly(readonly({})));
console.log(isProxy(reactive({})));
console.log(isProxy(readonly({})));
# 新组件
# Fragment (片断)
-
在 Vue2 中:组件必须有一个根标签
-
在 Vue3 中:组件可以没有根标签,内部会将多个标签包含在一个 Fragment 虚拟元素中
-
好处:减少标签层级,减小内存占用
-
案例.vue
<template>
  <h2>aaaa</h2>
  <h2>aaaa</h2>
</template>
# Teleport (瞬移)
-
Teleport 提供了一种干净的方法,让组件的 html 在父组件界面外的特定标签 (很可能是 body) 下插入显示
-
案例
-
App.vue
<template> <h2>App父级组件</h2> <hr> <ModalButton /> </template> <script lang="ts"> import { defineComponent } from 'vue' import ModalButton from './ModalButton.vue' export default defineComponent({ name: 'App', components:{ ModalButton } }) </script> -
ModalButton.vue
<template>
  <button @click="modalOpen = true">打开一个对话框</button>

  // 对话框代码
  <Teleport to="body">
    <div v-if="modalOpen" class="modal">
      <div>
        这是对话框
        <button @click="modalOpen = false">关闭对话框</button>
      </div>
    </div>
  </Teleport>
</template>
<script lang="ts">
import { defineComponent, ref } from 'vue'
export default defineComponent({
  name: 'ModalButton',
  setup() {
    // 控制对话框显示或者隐藏的
    const modalOpen = ref(false)
    return {
      modalOpen,
    }
  },
})
</script>
-
# Suspense (不确定的)
-
它们允许我们的应用程序在等待异步组件时渲染一些后备内容,可以让我们创建一个平滑的用户体验
-
案例
-
App.vue
<template> <h2>App父级组件:Suspense组件的使用</h2> <Suspense> <template #default> // 异步组件 // <AsyncComponent /> <AsyncAddress /> </template> <template v-slot:fallback> // loading的内容 <h2>Loading.....</h2> </template> </Suspense> </template> <script lang="ts"> import { defineComponent, defineAsyncComponent } from 'vue' // Vue2中的动态引入组件的写法:(在Vue3中这种写法不行) // const AsyncComponent = () => import('./AsyncComponent.vue') // Vue3中的动态引入组件的写法 // const AsyncComponent = defineAsyncComponent( // () => import('./AsyncComponent.vue') // ) // 静态引入组件 // import AsyncComponent from './AsyncComponent.vue' import AsyncAddress from './AsyncAddress.vue' export default defineComponent({ name: 'App', components: { // AsyncComponent, AsyncAddress, }, }) </script> -
AsyncComponent.vue
<template> <h2>AsyncComponent子级组件</h2> <h3>{{ msg }}</h3> </template> <script lang="ts"> import { defineComponent } from 'vue' export default defineComponent({ name: 'AsyncComponent', setup() { return new Promise((resolve, reject) => { setTimeout(() => { resolve({ msg: 'what are you no sha lei', }) }, 2000) }) // return {} }, }) </script> -
AsyncAddress.vue
<template>
  <h2>AsyncAddress组件</h2>
  <h3>{{ data }}</h3>
</template>
<script lang="ts">
import { defineComponent } from 'vue'
// 引入axios
import axios from 'axios'
export default defineComponent({
  name: 'AsyncAddress',
  // setup() {
  //   // return axios.get('/data/address.json').then((response) => {
  //   //   return {
  //   //     data: response.data,
  //   //   }
  //   // })
  // },

  async setup() {
    const result = await axios.get('/data/address.json')
    return {
      data: result.data,
    }
  },
})
</script>
-
# TodoList
-
utils—>localStorageUtils.ts
import { Todo } from "../types/todo"; // 保存数据到浏览器的缓存中 export function saveTodos(todos: Todo[]) { localStorage.setItem("todos_key", JSON.stringify(todos)); } // 从浏览器的缓存中读取数据 export function readTodos(): Todo[] { return JSON.parse(localStorage.getItem("todos_key") || "[]"); } -
Types—>todo.ts
// 定义一个接口,约束state的数据类型 export interface Todo { id: number; title: string; isCompleted: boolean; } -
App.vue
<template>
  <div class="todo-container">
    <div class="todo-wrap">
      <List :todos="todos" :deleteTodo="deleteTodo" :updateTodo="updateTodo" />
    </div>
  </div>
</template>
<script lang="ts">
import { defineComponent, onMounted, reactive, toRefs, watch } from "vue";
// 引入直接的子级组件
import List from "./components/List.vue";
// 引入接口
import { Todo } from "./types/todo";
import { saveTodos, readTodos } from "./utils/localStorageUtils";

export default defineComponent({
  name: "App",
  // 注册组件
  components: {List},
  setup() {
    // 定义一个数组数据
    // { todos: Todo[] } TS定义:todos是一个 Todo对象类型的数组,里边的每一个对象都遵循interface 所定义的类型
    // const state = reactive<{ todos: Todo[] }>({
    //   todos: [
    //     { id: 1, title: '奔驰', isCompleted: false },
    //     { id: 2, title: '宝马', isCompleted: true },
    //     { id: 3, title: '奥迪', isCompleted: false },
    //   ],
    // })

    const state = reactive<{ todos: Todo[] }>({
      todos: []
    });
    // 删除数据的方法
    const deleteTodo = (index: number) => {
      state.todos.splice(index, 1);
    };

    watch(() => state.todos, saveTodos, { deep: true });

    return {
      // ...toRefs(state) 这里是转成ref对象之后再进行解构,上边给List组件就可以直接传递todos了
      ...toRefs(state),
      deleteTodo,
    };
  }
});
</script>